How to stream Tidal and Qobuz on your odio Pi
Tidal and Qobuz streaming are available via upmpdcli. With either plugin enabled, upmpdcli becomes a full music library: you can browse, search, and play directly from any UPnP control point (e.g. BubbleDS Next or BubbleUPnP), in addition to its role as a DLNA renderer.
Both plugins ship with the default odio installation (the installer asks, and defaults to yes). What remains is authenticating with your account, a button on the settings page since 2026.9.0b1, as walked through below for Tidal. The full parameter list is in the official documentation:
There are two ways to play Tidal on the node: enable upmpdcli’s Tidal plugin, which adds Tidal to the node’s UPnP library for any control point, or use a control point that ships its own Tidal integration, like BubbleUPnP, which needs no configuration on the node at all.
Tidal in the node’s library (upmpdcli plugin)
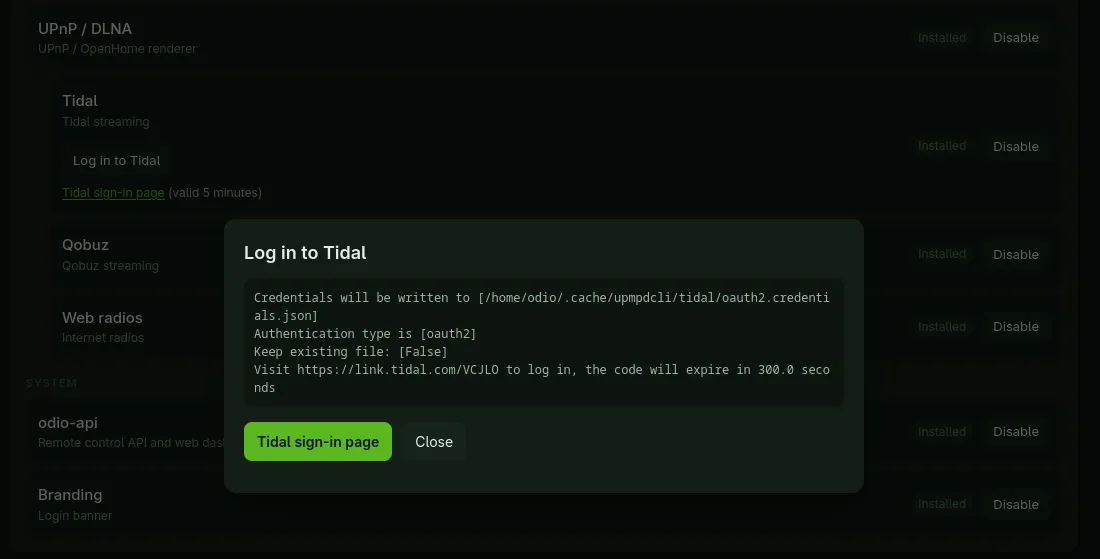
Section titled “Tidal in the node’s library (upmpdcli plugin)”Since 2026.9.0b1, the installer enables the plugin when the Tidal feature is installed, and signing in is a button on the node’s settings page: open the Tidal row, click Log in to Tidal, and follow the link it shows, valid for five minutes, from any browser. The token lands in ~/.cache/upmpdcli/tidal/oauth2.credentials.json in the odio user’s home. Then restart upmpdcli.
Stream quality and country code keep their defaults. To change them, edit upmpdcli’s config as the odio user over SSH:
sudo su - odionano ~/.config/upmpdcli/upmpdcli.confIn the Tidal streaming service parameters section:
tidalaudioquality = HI_RES_LOSSLESStidaloverridecountrycode = FRManual setup on releases before 2026.9.0b1
upmpdcli runs as the odio user and reads its config from odio’s home directory, so every step below starts by switching to that user from your SSH session:
sudo su - odio1. Enable the Tidal plugin
Section titled “1. Enable the Tidal plugin”As the odio user, edit the config (it belongs to odio, so from any other user it appears read-only):
nano ~/.config/upmpdcli/upmpdcli.confIn the Tidal streaming service parameters section, set:
tidaluser = your@email.exampletidalaudioquality = HI_RES_LOSSLESStidaloverridecountrycode = FRtidaluseris what activates the plugin. The upmpdcli manual describes it as a bogus variable: it isn’t checked against your Tidal account, which is authenticated in the next step.tidalaudioqualitysets the maximum stream quality.tidaloverridecountrycodeoverrides the country code; adjust to yours.
2. Authenticate with your Tidal account
Section titled “2. Authenticate with your Tidal account”Still as the odio user, run the credentials helper shipped with the plugin:
python3 /usr/share/upmpdcli/cdplugins/tidal/get_credentials.py -f ~/.cache/upmpdcli/tidal/oauth2.credentials.jsonThe script prints a Tidal login URL. Open it in a browser on any device and sign in. The script then writes the OAuth2 token to ~/.cache/upmpdcli/tidal/oauth2.credentials.json (no need to create the directory beforehand) and confirms with:
Displaying credentials file for type [/home/odio/.cache/upmpdcli/tidal/oauth2.credentials.json], json format:...Restart upmpdcli
Section titled “Restart upmpdcli”Restart upmpdcli.service to pick up the new config and credentials, from the embedded UI’s Services panel (one click on the restart icon next to the service), or from the same odio terminal:
systemctl --user restart upmpdcli.serviceTidal then joins the node’s UPnP library alongside the built-in webradio sources, so you can browse, search, and play it from any control point.
Tidal via BubbleUPnP’s own integration
Section titled “Tidal via BubbleUPnP’s own integration”BubbleUPnP on Android also ships its own Tidal integration in its Local and Cloud library, independent of the upmpdcli plugin, so nothing needs to be configured on the node. In the tested setup, BubbleUPnP detected the odio node on its own and asked for a one-time sign-in to Tidal; from there you can browse your Tidal library in the app and direct playback to the node like to any DLNA renderer.
Qobuz plays two ways. Qobuz Connect makes the node a device in the official Qobuz app, added in 2026.9.0b1, enabled and signed in from the settings page. The upmpdcli plugin adds Qobuz to the node’s UPnP library instead; it is configured in the same file as Tidal, through its own set of parameters. We don’t have a tested walkthrough yet; if you have set up Qobuz with odio, help us improve this page — open an issue.